Template documentation
Set up your shop
A Webstudio shop on Merchant and Stripe, with customer accounts. About 30 minutes from template to first test order.
Provided by ELECOS. The footer credits ELECOS and links to its imprint; replace both with your own details when you use the template.
How it works
This template is a complete small shop. Everything you see is designed natively in Webstudio on the Craft design system. Commerce runs on Merchant, an open-source backend for Cloudflare Workers and Stripe.
| Part | Runs on | Does |
|---|---|---|
| Webstudio site | Webstudio | Pages and design. Loads products server-side through Resources, so the catalog is fast and indexable. |
| Merchant | Your Cloudflare account | Products, variants, stock, carts, Stripe Checkout, orders, discounts, product images. |
| Account Worker (optional) | Your Cloudflare account | Customer sign-in by email link, order history, and the order number on the confirmation page. |
| Shop Bridge | Inside the Webstudio project | A small script in an HTML Embed of the Header slot. It runs the cart, checkout and sign-in in the browser. |
A purchase, step by step
- The shopper adds products. The cart lives in the browser (
localStorage) until checkout, because Merchant carts need an email address up front. - On
/cartthey fill in contact details and the shipping address in a form designed in Webstudio.bridge.jscreates a Merchant cart, and Merchant re-prices every item, checks stock and applies the discount code. - Merchant opens a Stripe Checkout session with that address. Only a compact Stripe payment box appears on the page (card, Apple Pay, Google Pay, Link).
- After payment Stripe returns the shopper to
/checkout/success. Stripe's webhook tells Merchant to create the order and reduce stock. - The shopper can sign in at
/accountwith a one-time email link to see their orders and tracking.
Server and browser
Webstudio renders every page on the server. That covers everything that is the same for all visitors. Anything that belongs to one visitor (their cart, their payment, their account) can only happen in the browser, and that is the job of bridge.js.
| Rendered on the server by Webstudio | Handled in the browser by bridge.js |
|---|---|
| All pages, layout, text, header and footer | Cart contents, item count badge and the cart drawer |
| Product list and product pages, fetched from Merchant through Resources with the public key | Adding to cart, changing quantities, removing items |
| Prices, descriptions and variant options as HTML, so search engines and link previews see them | Switching the shown price when a variant is picked |
| Page titles, meta descriptions and a real 404 status for unknown products | Checkout: creating the Merchant cart and mounting Stripe's payment form |
| The designs for a cart line and an order row, as hidden templates | Order number on the confirmation page, sign-in, sign-out and order history |
Why Webstudio needs a bridge
- Resources run on the server once per page request. They can read public data such as the product catalog, but not a visitor's own state: a cart in
localStorageor a sign-in session only exists in that visitor's browser. - Checkout is a sequence of calls (create cart, add items, apply discount, start payment) whose results feed the next step and end in Stripe's payment form. That needs code running on the page, and Stripe.js only runs in the browser.
- Secret keys must never reach Webstudio. Everything that needs Merchant's admin key (orders, customers) goes through the account Worker, which only returns the signed-in customer's own orders.
How the bridge stays out of the design
- The bridge draws no layout. It finds elements you designed by
data-*attributes and only fills in text, toggleshiddenand clones the hidden templates. Moving or restyling elements in Webstudio never breaks it. - It is one dependency-free script inside the Shop Bridge HTML Embed of the Header slot, so every page has it and copying the project copies it. Its readable source is
webstudio/bridge.jsin the template repository. - It starts after Webstudio has hydrated the page and watches for client-side navigation, so it works across page changes without a reload.
- It handles its forms before Webstudio's router does, which otherwise would turn a submit into a page navigation.
What you need
- A Webstudio plan with dynamic data (Resources).
- A Cloudflare account. The Workers free plan is enough to start; Merchant uses Durable Objects and R2, the account Worker uses D1.
- A domain on Cloudflare DNS if you want sign-in emails (Cloudflare Email Sending).
- A Stripe account. Test mode works for everything below.
- Node.js 20+ on your computer for the one-time setup commands.
Get the code from the template repository. It contains account/ (the account Worker), merchant.patch (additions and fixes for Merchant, see Changes to Merchant) and webstudio/bridge.js (the readable source of the Shop Bridge). Merchant itself always comes from its own repository; the template does not ship a fork.
Choose your checkout
The template supports two checkouts. You pick one by filling in, or leaving empty, stripePublishableKey in the shop variable.
| Embedded (recommended) | Hosted | |
|---|---|---|
| What the shopper sees | Your own Webstudio form for contact and shipping address, then a compact Stripe payment box on the same page | Email on your page, then a redirect to Stripe's checkout page, which asks for the address and payment |
| Merchant | Needs merchant.patch | Works with unmodified Merchant; the patch's stock fix is still recommended |
stripePublishableKey | pk_test_… / pk_live_… | Empty. The address fields on /cart hide automatically. |
| Stripe Tax | Optional (STRIPE_AUTOMATIC_TAX) | Must be active: unmodified Merchant always enables it |
| Line items on Stripe | “Beeswax Candle – Large” | “Large” (variant name only) |
Countries offered for shipping come from the options of the Country select on /cart, in both modes. Edit them in Webstudio.
1. Deploy Merchant
git clone https://github.com/ygwyg/merchant.gitcd merchantgit apply ../webstudio-merchant-template/merchant.patch # skip for hosted checkoutnpm installnpx wrangler loginnpx wrangler deployOptionally rename the Worker in wrangler.jsonc ("name"); the account Worker refers to Merchant by this name. If you want order emails, also add "compatibility_flags": ["global_fetch_strictly_public"] there: it lets Merchant's webhooks reach the account Worker on the same Cloudflare account.
Wrangler prints your Merchant URL, for example https://webstudio-merchant.your-subdomain.workers.dev. Now create the API keys. This works exactly once per store:
MERCHANT_URL=https://webstudio-merchant.your-subdomain.workers.dev npx tsx scripts/init.ts --remote| Key | Starts with | Where it goes |
|---|---|---|
| Public key | pk_ | Webstudio shop variable. Safe in the browser: it can only read products and create carts. |
| Admin key | sk_ | Only the account Worker secret and your password manager. Never paste it into Webstudio. |
Run the init command right after deploying. Until keys exist, anyone who finds the URL could create them first.
2. Connect Stripe
- In Stripe → Developers → Webhooks, add an endpoint
MERCHANT_URL/v1/webhooks/stripefor the eventscheckout.session.completedandcheckout.session.expired. Copy its signing secret (whsec_…). - Give Merchant your secret key and the signing secret. Merchant reads the key in two places, so set both:
npx wrangler secret put STRIPE_SECRET_KEYcurl -X POST $MERCHANT_URL/v1/setup/stripe \ -H "Authorization: Bearer sk_…" -H "content-type: application/json" \ -d '{"stripe_secret_key":"sk_test_…","stripe_webhook_secret":"whsec_…"}'Copy your publishable key (pk_test_… or pk_live_…) from Stripe → Developers → API keys. It goes into the Webstudio shop variable and enables the payment form on your own page. Leave it empty to send shoppers to Stripe's hosted page instead.
Taxes
STRIPE_AUTOMATIC_TAX in merchant/wrangler.jsonc controls Stripe Tax. It is "false" in this template. Set it to "true" only after Stripe Tax is active on your Stripe account, otherwise every checkout fails.
3. Deploy the account Worker
Open account/wrangler.jsonc and set:
| Setting | Value |
|---|---|
SHOP_NAME | Your shop's name, used in sign-in emails. |
SITE_ORIGIN | Your published site, for example https://shop.example.com. |
ALLOWED_ORIGINS | Other origins allowed to call the Worker, comma separated: your *.wstd.io staging domain and the Builder canvas origin. |
MAIL_FROM | Sender address on a domain onboarded to Cloudflare Email Sending. |
SHOP_INBOX | Your inbox for “new order” emails. Leave empty to skip them. |
ADMIN_URL | Your Merchant admin URL, linked from “new order” emails. |
services | Points to your Merchant Worker by name. Workers on the same account cannot fetch each other's workers.dev URLs, so they talk through this binding. |
cd accountnpm installnpx wrangler deploynpx wrangler d1 execute webstudio-merchant-account --remote --file=schema.sqlnpx wrangler secret put MERCHANT_ADMIN_KEYSign-in emails
In Cloudflare go to Compute → Email Service → Email Sending and onboard your domain or a subdomain. Cloudflare adds the SPF, DKIM and DMARC records for you. Onboarding a subdomain keeps your main domain's email untouched.
Until email is set up, the sign-in form answers “Sign-in by email isn't set up for this shop yet.” Everything else works.
Order emails
With the account Worker deployed, every paid order sends two emails through Cloudflare Email Sending:
| To | Contains | |
|---|---|---|
| Order confirmation | The customer | Order number, items, totals, shipping address and a link to their account |
| New order | SHOP_INBOX | The same details plus the customer's email and a link to your Merchant admin |
Merchant tells the account Worker about new orders with its signed order.created webhook. Register it once and store the secret Merchant returns:
curl -X POST $MERCHANT_URL/v1/webhooks -H "Authorization: Bearer sk_…" \ -H "content-type: application/json" \ -d '{"url":"https://ACCOUNT_WORKER_URL/hooks/merchant","events":["order.created"]}'cd account && npx wrangler secret put MERCHANT_WEBHOOK_SECRET # paste the returned whsec_…- The Worker checks Merchant's signature on every call and sends each order's emails only once, even when Merchant retries.
- Customers who sign in at
/accountwith the same email see every order with items, prices, totals, shipping address, status and tracking.
4. Configure the Webstudio project
All connection settings live in one place: the shop variable on Global Root (Data variables panel). Edit it and publish.
| Field | Example | Used for |
|---|---|---|
name | Hearth | Shop name |
apiUrl | https://webstudio-merchant….workers.dev | Merchant URL for Resources and checkout |
publicKey | pk_… (Merchant) | Reading products, creating carts |
stripePublishableKey | pk_test_… (Stripe) | Embedded checkout. Leave empty for the hosted checkout. |
accountUrl | https://webstudio-merchant-account….workers.dev | Sign-in, orders, and loading bridge.js |
currency | USD | Display currency |
Leave accountUrl empty if you don't deploy the account Worker: the shop and checkout work without it, and only sign-in and the order number on the confirmation page need it.
A fresh copy of this template is still connected to the ELECOS demo backend in Stripe test mode, so it works right away. Replace the shop values with your own before you publish your shop; until then, test orders from your copy land in the demo store.
5. Test a purchase
While Merchant uses Stripe test keys (sk_test_…, pk_test_…), no real money moves. Add something to the cart, continue to payment and use:
| Field | Enter |
|---|---|
| Card number | 4242 4242 4242 4242 |
| Expiry date | Any date in the future, for example 12/34 |
| CVC | Any three digits, for example 123 |
| Name, address, ZIP | Anything |
To test other outcomes, use 4000 0025 0000 3155 (asks for 3-D Secure confirmation) or 4000 0000 0000 9995 (declined: insufficient funds). Stripe lists more in its testing documentation.
After paying you land on /checkout/success with your order number. The order appears in Merchant's admin, and signing in at /account with the same email shows it in the order history.
Going live
- Switch Stripe to live mode and repeat step 2 with live keys:
STRIPE_SECRET_KEY, a live webhook endpoint and its signing secret, andPOST /v1/setup/stripe. - Put the live publishable key (
pk_live_…) into theshopvariable. - Delete the Demo Notice on the cart page (inside the Payment section) and replace the placeholder legal pages.
- Publish, then place one real order and refund it through Merchant to confirm the whole flow.
Managing products
The easiest way is Merchant's admin dashboard. It ships with Merchant and deploys as its own small Worker:
cd merchant/adminnpm install && npm run buildnpx wrangler deployOpen the URL Wrangler prints and sign in with your Merchant URL and admin key (sk_…). The key stays in that browser only. The dashboard manages products, variants, stock, images, orders, customers and discounts.
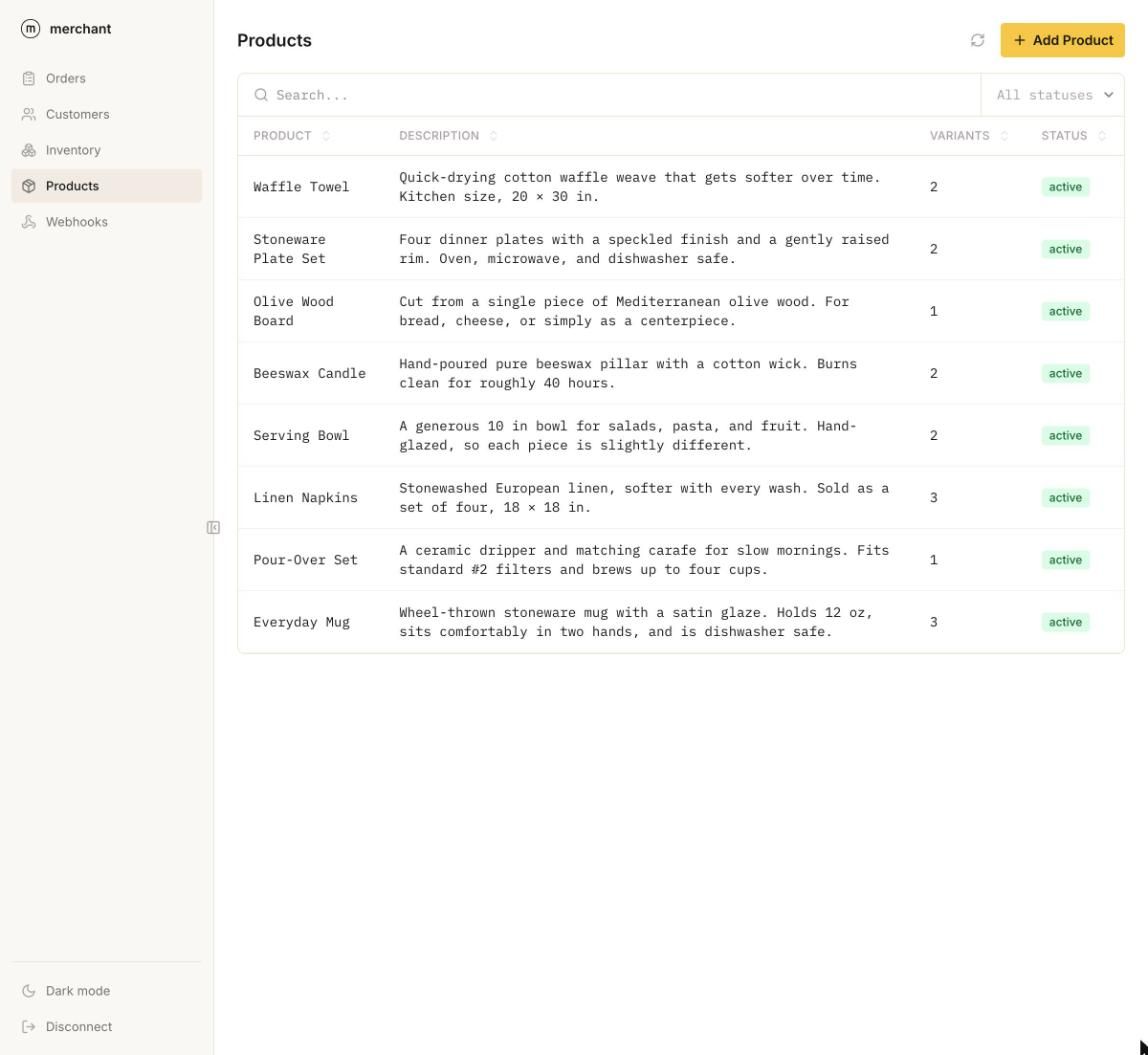
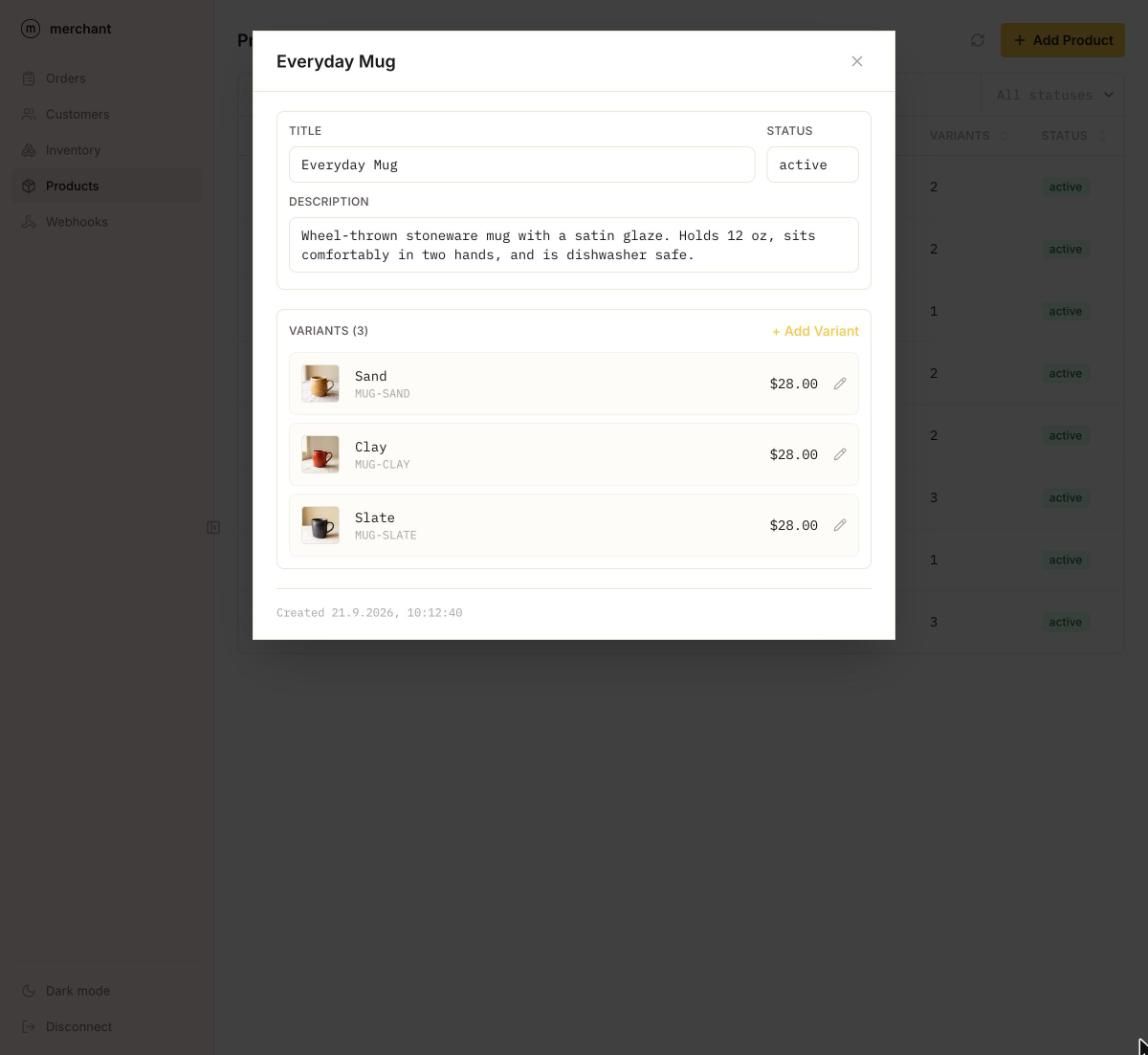
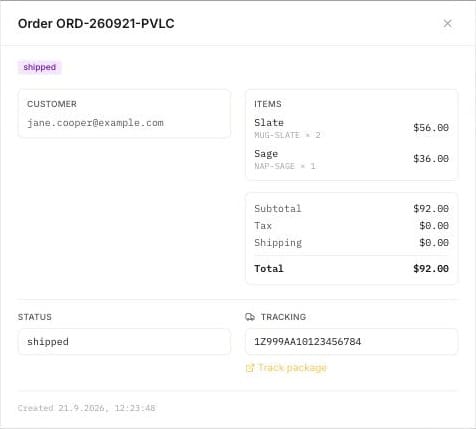
You can also use the API directly:
# 1. Create a product (starts as draft)curl -X POST $MERCHANT_URL/v1/products -H "Authorization: Bearer sk_…" \ -H "content-type: application/json" -d '{"title":"Everyday Mug","description":"…"}'# 2. Upload an image, then add a variant (price in cents)curl -X POST $MERCHANT_URL/v1/images -H "Authorization: Bearer sk_…" -F file=@mug.jpgcurl -X POST $MERCHANT_URL/v1/products/PRODUCT_ID/variants -H "Authorization: Bearer sk_…" \ -H "content-type: application/json" \ -d '{"sku":"MUG-SAND","title":"Sand","price_cents":2800,"image_url":"https://…/v1/images/…"}'# 3. Add stock and publishcurl -X POST $MERCHANT_URL/v1/inventory/MUG-SAND/adjust -H "Authorization: Bearer sk_…" \ -H "content-type: application/json" -d '{"delta":40,"reason":"restock"}'curl -X PATCH $MERCHANT_URL/v1/products/PRODUCT_ID -H "Authorization: Bearer sk_…" \ -H "content-type: application/json" -d '{"status":"active"}'- Only
activeproducts appear in the shop. Product changes need no republish of the site. - Merchant stores one image per variant. The product page turns them into a gallery: each thumbnail selects its variant, so photo, price and option always match. Products with one variant show a single photo.
- Cards show the first variant's image and price. Create the cheapest variant first so “From $X” is right.
- Discount codes are created with
POST /v1/discountsand entered by shoppers on the cart page.
Changing the design
The project follows Craft: theme variables → semantic variables → composite Tokens, all on Global Root. See the style guide for every color pairing, Token and extension.
| To change | Edit |
|---|---|
| Brand color | --seed-accent (all accent shades derive from it) |
| Neutral tone | --seed-neutral |
| Corner rounding | --theme-radius |
| Spacing density | --theme-space |
| Fonts | --theme-font-body, --theme-font-display (upload fonts under Assets first) |
| Dark mode | Set color-scheme on Global Root to light dark. Every theme color already has a dark value. |
Tokens such as button, card, heading and Product Card only use semantic variables, so re-theming never requires editing a Token.
Moving and restyling elements
bridge.js finds elements by data-* attributes, not by position or class. Restyle or move anything freely, but keep these attributes (Settings → Attributes) on the element that should do the job:
| Attribute | Where | Purpose |
|---|---|---|
data-cart-open, data-cart-close | Buttons | Open and close the cart drawer |
data-cart-drawer | Dialog in Header | The cart drawer |
data-cart-count | Badge | Number of items; hidden when empty |
data-cart-lines | List | Cart lines are rendered here |
data-cart-line-template | One list item | Design for a cart line; its data-field children are filled in |
data-cart-empty, data-cart-summary, data-cart-subtotal | Cart | Empty state, totals |
data-add-to-cart | Product form | Adds the chosen variant; needs inputs named sku and qty |
data-checkout-form | Cart page form | Inputs named email, phone, name, line1, line2, city, state, postal_code, country; optional discount |
data-checkout-fields, data-checkout-address | Cart page | Customer details (hidden while paying); the address part (hidden in hosted mode) |
data-checkout-actions, data-checkout-payment, data-checkout-mount | Cart page | Discount and button; the payment section; where Stripe's box mounts |
data-signin-form, data-account-signed-in, data-account-signed-out | Account page | Sign-in and the two account states |
data-order-template, data-orders-list | Account page | Design for one order in the history |
Fulfilling orders
Orders appear in Merchant once Stripe confirms payment. Mark an order as shipped with a tracking link, and the customer sees it in their account:
curl -X PATCH $MERCHANT_URL/v1/orders/ORDER_ID -H "Authorization: Bearer sk_…" \ -H "content-type: application/json" \ -d '{"status":"shipped","tracking_number":"1Z…","tracking_url":"https://…"}'Refunds: POST /v1/orders/ORDER_ID/refund, optionally with amount_cents for a partial refund. Merchant can also call your own webhooks on order.created, order.shipped and inventory.low.
Keys and security
| Secret | Lives in | Never in |
|---|---|---|
Merchant admin key sk_… | Account Worker secret, your password manager | Webstudio, the browser, git |
Stripe secret key sk_… | Merchant secret + Merchant config | Webstudio, the browser, git |
Stripe webhook secret whsec_… | Merchant config | Anywhere public |
- Sign-in links work once and expire after 15 minutes; sessions last 30 days. Only SHA-256 hashes of tokens are stored.
- The account Worker answers only origins listed in
SITE_ORIGINandALLOWED_ORIGINS. - Prices always come from Merchant at checkout; the browser cart can't change what a shopper pays.
Good to know
- Merchant has no product slugs or categories. Product URLs use the product ID, and the shop is one list.
- Stock is not visible with the public key. If an item runs out, the shopper gets a clear message at checkout.
- The legal pages contain placeholder text. Replace it before you launch.
- Merchant keeps inventory reserved while a checkout is open; abandoned sessions release it when they expire.
Changes to Merchant
The template uses unmodified Merchant plus merchant.patch: four small, backwards-compatible additions for the embedded checkout and one bug fix for stock reservations (about 110 lines in src/). Existing Merchant clients keep working. The hosted checkout needs none of the additions, but the stock fix is worth applying either way. The patch was checked against Merchant commit 1b42cbb.
| Change | What it does | Why the template needs it |
|---|---|---|
| Embedded checkout | POST /v1/carts/:id/checkout accepts ui_mode: "embedded" with a return_url and then returns a client_secret instead of checkout_url. Hosted checkout stays the default. | Stripe's payment form shows on your own /cart page instead of redirecting to stripe.com. |
STRIPE_AUTOMATIC_TAX | Setting it to "false" creates checkout sessions without Stripe Tax. Without the setting, behaviour is unchanged (tax on). | Upstream always enables Stripe Tax, so checkout fails until Stripe Tax is activated. New shops can now start selling first. |
| Line item names | Cart items are named “Product – Variant”, for example “Beeswax Candle – Large”. | Upstream uses only the variant title (“Large”), which is unclear on Stripe, receipts and order history. |
| Address from your form | Checkout accepts a shipping_address object. Stripe then does not ask for an address, and the webhook stores it on the order. | Lets the checkout form be designed in Webstudio, with only the payment in Stripe's box. |
| Stock reservations (bug fix) | Abandoned checkouts release their reserved stock when Stripe expires the session (after 30 minutes, via checkout.session.expired). Expired carts no longer push reserved below zero. | Upstream never releases abandoned checkouts, and its cart cleanup makes reserved negative, which inflates available stock and can oversell. |
If Merchant changes and the patch no longer applies, git apply --3way ../webstudio-merchant-template/merchant.patch usually resolves it. These changes are good candidates for a pull request upstream; once merged, the patch step goes away.